
.JPG)

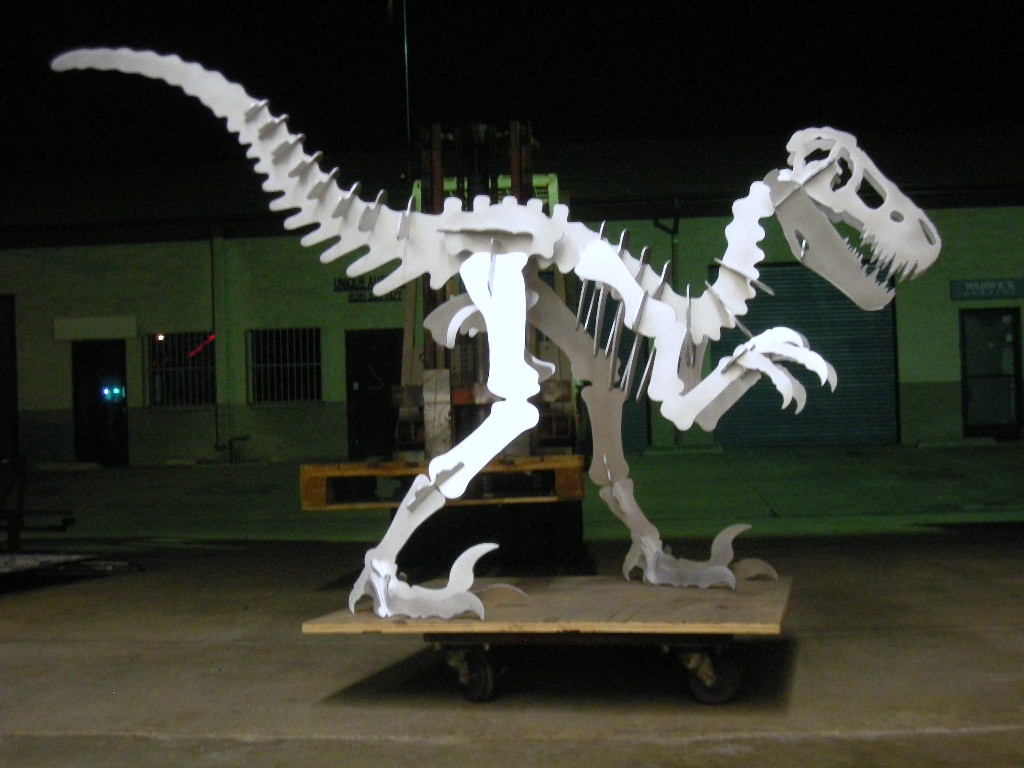
Dinosaur puzzle anatomy and step-by-step assembly instructions

ANATOMY OF A DINOSAUR.
Although we have made a great effort to accurately reproduce the various bones of an Allosaurus Dinosaur with our 3D puzzle, obviously, many of the bones on our dinosaur are modified or missing completely compared to an actual skeleton. Here's a diagram of a 'generic' dinosaur skeleton fossil with the basic location and scientific names of the major bones, most of which are represented on our model albeit modified for purposes of design. Scroll down and review everything here including the puzzle key and videos at the bottom of the page before beginning assembly.
ASSEMBLY INSTRUCTIONS.
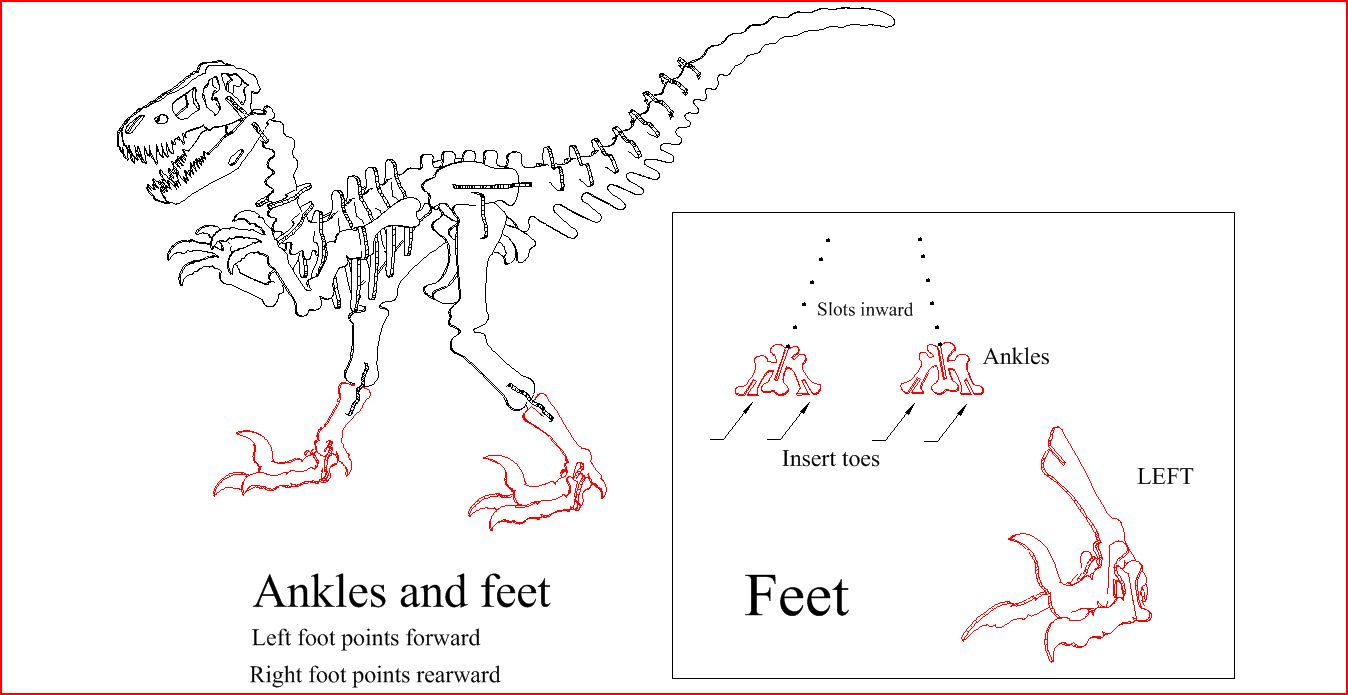 ASSEMBLY STEP ONE:
The feet. Our
puzzle has two bones labeled "ankle". Although this dinosaur did not have a
conventional foot like a human and actually has a foot similar to a giant four
ton chicken, we will call this
collection of bones the 'ankle' for simplicity. Insert the toes (called
"phalanges") into the bottom of each ankle. The slots on the top of
the ankle must slant inward with the toes pointed forward. Our
puzzle has a section of leg connected to each center toe. The section of leg
connected to the center toe is the "metatarsal". Insert each metatarsal in
to each ankle from the top. The left metarsal points forward. The right
points slightly rearward. Place the assembled feet in the approximate correct
position.
ASSEMBLY STEP ONE:
The feet. Our
puzzle has two bones labeled "ankle". Although this dinosaur did not have a
conventional foot like a human and actually has a foot similar to a giant four
ton chicken, we will call this
collection of bones the 'ankle' for simplicity. Insert the toes (called
"phalanges") into the bottom of each ankle. The slots on the top of
the ankle must slant inward with the toes pointed forward. Our
puzzle has a section of leg connected to each center toe. The section of leg
connected to the center toe is the "metatarsal". Insert each metatarsal in
to each ankle from the top. The left metarsal points forward. The right
points slightly rearward. Place the assembled feet in the approximate correct
position.
 STEP
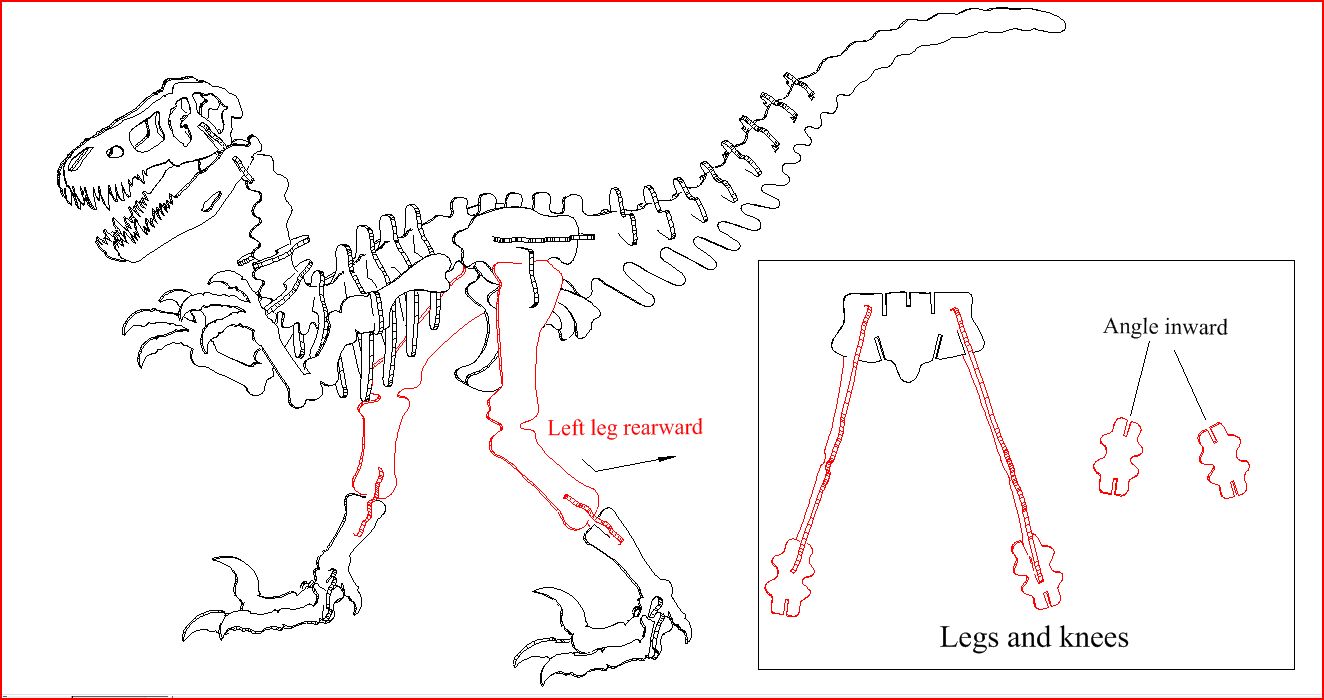
TWO: Legs and knees. Each leg is separated
between the middle leg (called the "tibia") and the metatarsal. A leg
connector is used here. Insert a leg connector into each foot assembly. The slot
in the top of each leg connector should slant inward. Insert the left leg
(tibia) into the left leg connector. The tibia of the left leg points rearward.
Repeat for the right leg. Tibia of the right leg points more or less forward.
The upper portion of the leg is the "femur". The slots at the top of each femur
should be more or less vertical when assembled correctly.
STEP
TWO: Legs and knees. Each leg is separated
between the middle leg (called the "tibia") and the metatarsal. A leg
connector is used here. Insert a leg connector into each foot assembly. The slot
in the top of each leg connector should slant inward. Insert the left leg
(tibia) into the left leg connector. The tibia of the left leg points rearward.
Repeat for the right leg. Tibia of the right leg points more or less forward.
The upper portion of the leg is the "femur". The slots at the top of each femur
should be more or less vertical when assembled correctly.
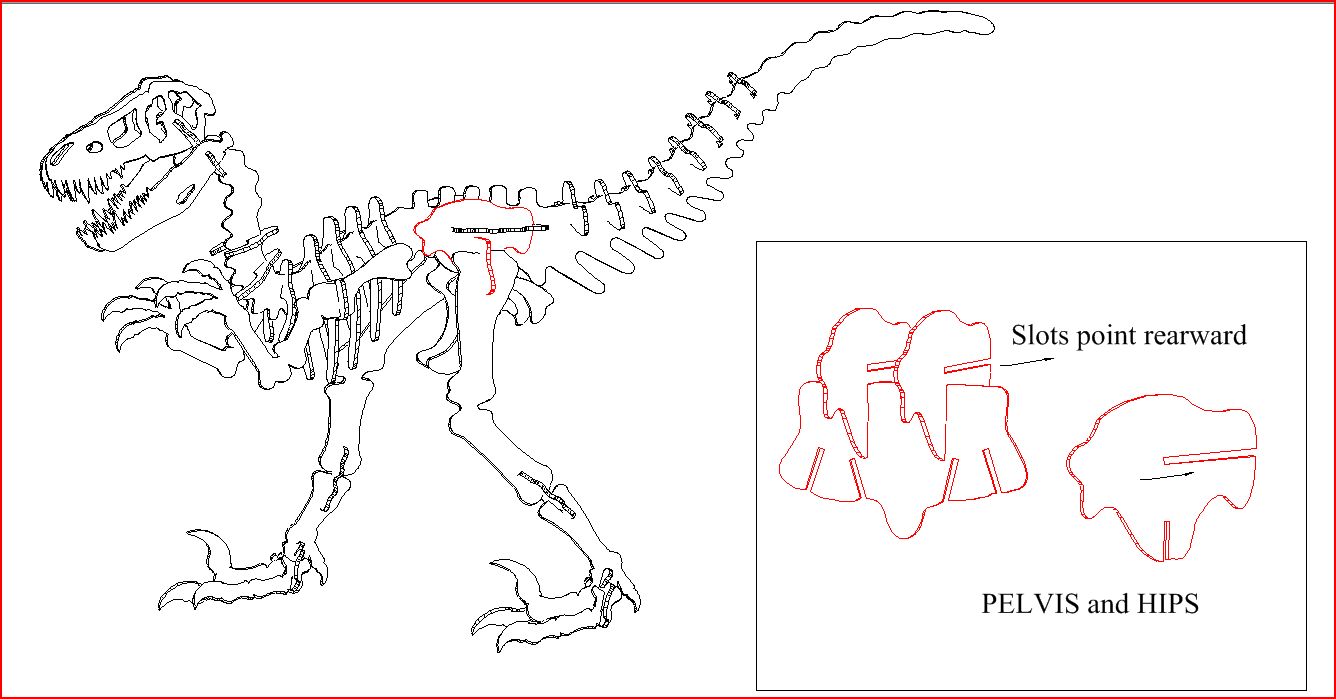
STEP THREE: The pelvis and hips. The pelvis of Allosaurus has three separate elements; the ilium, ischium and pubis. The pubis is directed forward as in all "saurischian" pelvis dinosaurs. In our puzzle, the ischium and pubis is already connected and we will install these later These are the parts that look like a pelvic bone. First we need to connect the ilium to the hips. Our puzzle uses two pieces which we will call the horizontal hip plate and the vertical hip plate. Install each ilium into the top of the vertical hip plate with the long slots in the ilium pointed rearward (see diagram).
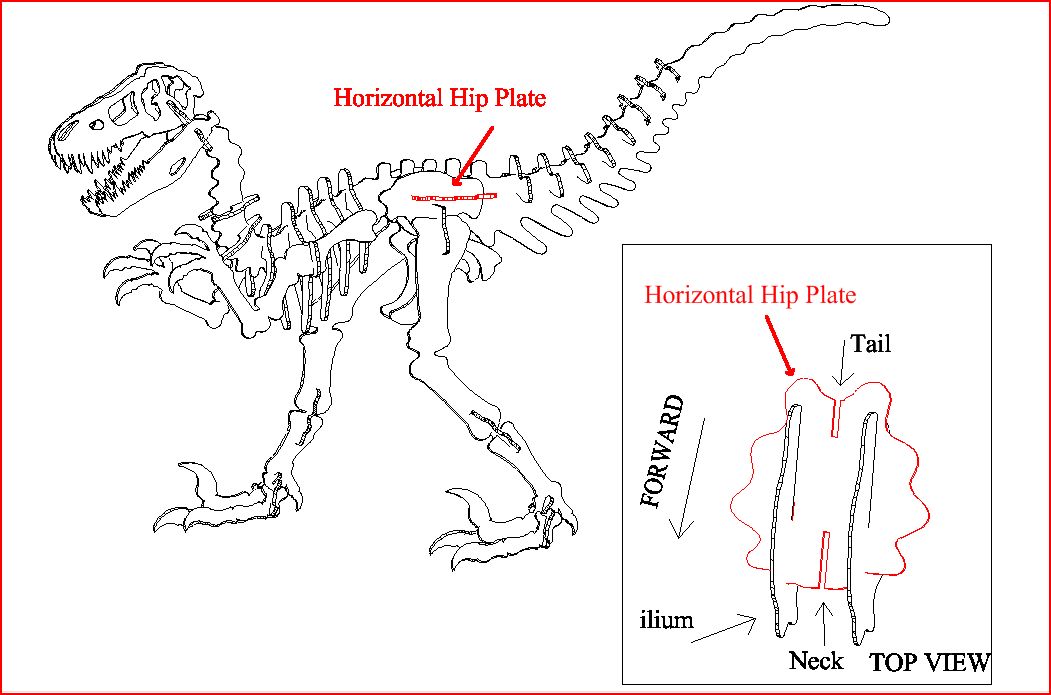 STEP FOUR: Horizontal hip plate. The horizontal
hip plate has two center slots. One longer than the other. Insert the horizontal
hip plate into both ilium (already inserted into the vertical hip plate in step
3).
The longer slot needs to point forward and the neck will eventually be inserted here.
As seen from the top, the shorter center slot points rearward.
STEP FOUR: Horizontal hip plate. The horizontal
hip plate has two center slots. One longer than the other. Insert the horizontal
hip plate into both ilium (already inserted into the vertical hip plate in step
3).
The longer slot needs to point forward and the neck will eventually be inserted here.
As seen from the top, the shorter center slot points rearward.
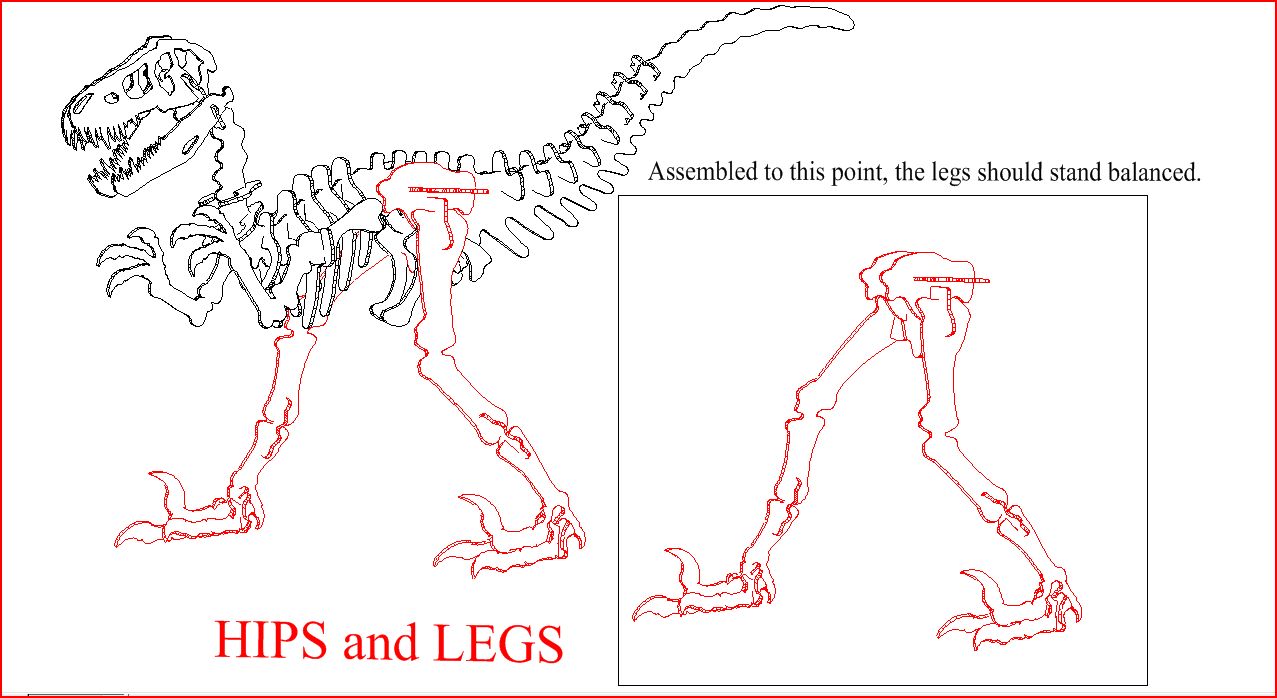 STEP
FIVE: Hips and legs. At this point you should have both hip plates and both
ilium assembled as one unit. Insert the legs into the hip assembly. Remember,
the long center slot in the hip plate needs to point forward as seen in step 4.
The entire assembly now with the hip plates, both ilium, both legs and feet
should more or less stand up as one unit. It will balance better when we
add the neck and tail assemblies later. Set this all aside while we assemble the
head.
STEP
FIVE: Hips and legs. At this point you should have both hip plates and both
ilium assembled as one unit. Insert the legs into the hip assembly. Remember,
the long center slot in the hip plate needs to point forward as seen in step 4.
The entire assembly now with the hip plates, both ilium, both legs and feet
should more or less stand up as one unit. It will balance better when we
add the neck and tail assemblies later. Set this all aside while we assemble the
head.
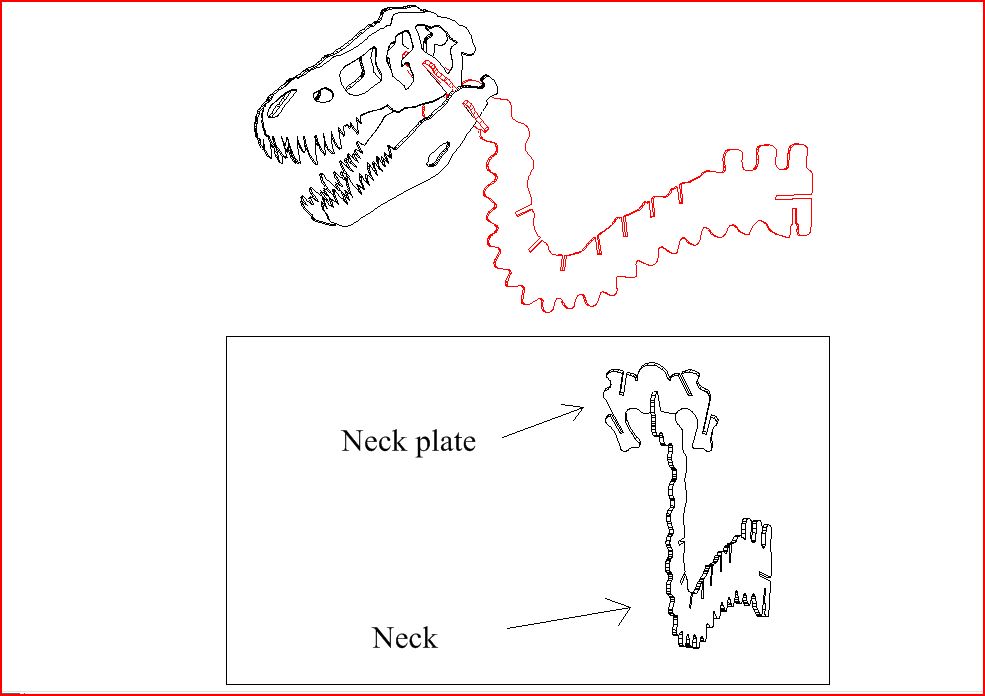
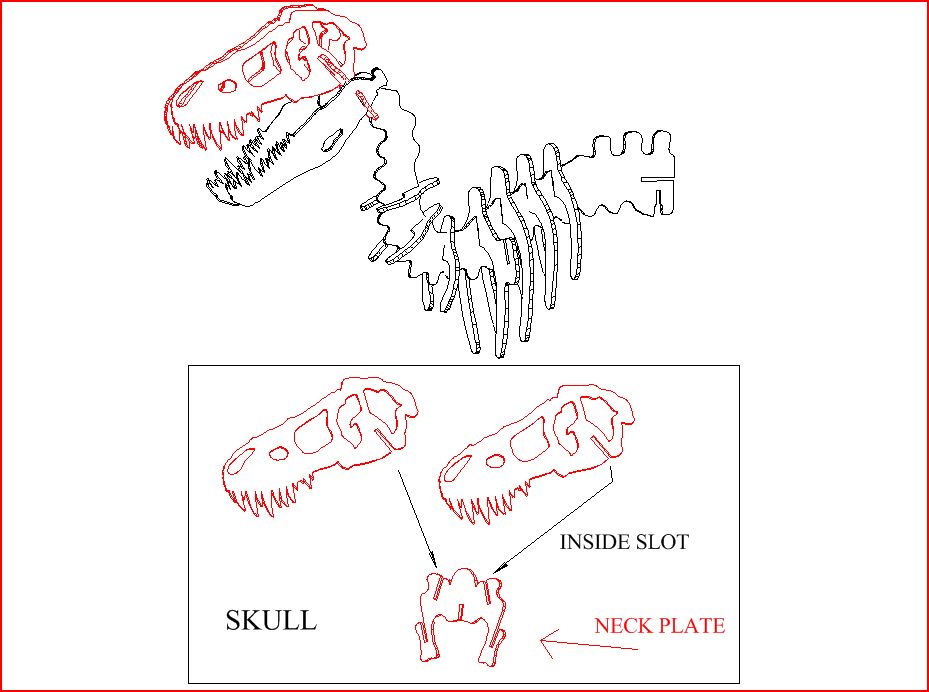 STEP
SIX: The neck plate and upper skull. Locate the neck plate and the two
upper halves of the skull. Inspect the skull halves. Generally, one
side may look a little cleaner than the other. Orient each upper skull half so
the nicest surface is on the outside. Insert each upper skull into the two top
slots on the neck plate.
STEP
SIX: The neck plate and upper skull. Locate the neck plate and the two
upper halves of the skull. Inspect the skull halves. Generally, one
side may look a little cleaner than the other. Orient each upper skull half so
the nicest surface is on the outside. Insert each upper skull into the two top
slots on the neck plate.
 STEP
SEVEN: Lower jaws. The lower jaw is known as the "dentary". As with the upper
skull, inspect the jaws and determine if one side is cleaner cut than the other.
If so, orient the jaws so the nicest sides are on the outside of the model.
Insert each dentary into the lowest slots on the neck plate (see diagram). The
head should now be one complete assembly. For plastic and wood models, a
'jaw connector' is provided to hold the lower jaws together. For steel and
aluminum models, the neck plate is manufactured with a slight forward bend in order to force the
lower jaws together and the jaw connector is not required.
STEP
SEVEN: Lower jaws. The lower jaw is known as the "dentary". As with the upper
skull, inspect the jaws and determine if one side is cleaner cut than the other.
If so, orient the jaws so the nicest sides are on the outside of the model.
Insert each dentary into the lowest slots on the neck plate (see diagram). The
head should now be one complete assembly. For plastic and wood models, a
'jaw connector' is provided to hold the lower jaws together. For steel and
aluminum models, the neck plate is manufactured with a slight forward bend in order to force the
lower jaws together and the jaw connector is not required.
STEP EIGHT: The Skull. The top of the neck has slots for the "cervical vertebrae" which we will install later. Hold the neck with the slots for the vertebrae pointed upward. Install the now assembled skull and neck plate into the slot at the front of the main long neck piece (the narrow end). Hold this assembly together in one hand and get ready to install the tail with the other. The legs and hip assembly should be standing near-by. We will need to install the neck/head assembly at the same time that will install the main tail section so the model will remain balanced and standing while we complete installing the rest of the parts.
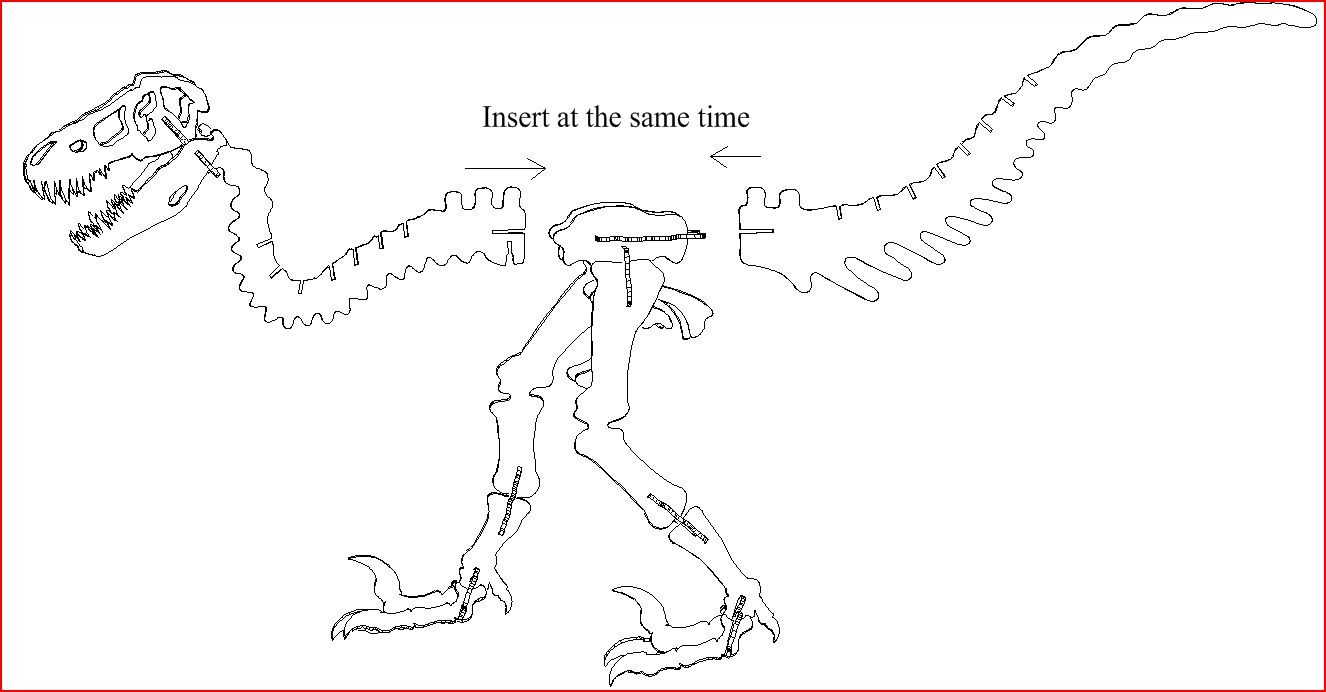 STEP
NINE: Neck and tail. The tail has slots on the top for the "caudal
vertebra" which we will install later. The lumps on the bottom of the tail
represent the "haemal arches". Balance the legs and hips in front of you.
Hold the tail with the slots for the vertebra pointed upward and the haemal
arches pointed downward. With he skull and main neck plate in one
hand and the mail tail section in the other, insert both at the same time and
the model should remain balanced.
STEP
NINE: Neck and tail. The tail has slots on the top for the "caudal
vertebra" which we will install later. The lumps on the bottom of the tail
represent the "haemal arches". Balance the legs and hips in front of you.
Hold the tail with the slots for the vertebra pointed upward and the haemal
arches pointed downward. With he skull and main neck plate in one
hand and the mail tail section in the other, insert both at the same time and
the model should remain balanced.
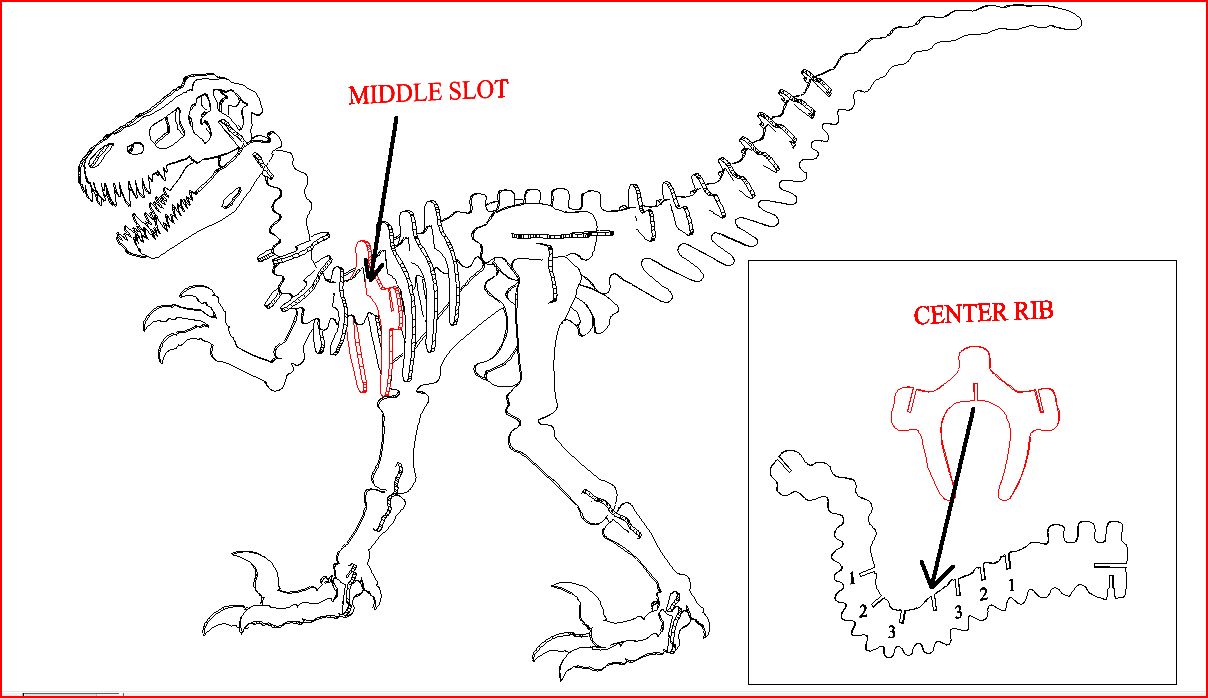
STEP TEN: Center rib. This rib is installed in the center slot in the top of the neck. It is the forth slot when counting from either the front or the rear (center slot).
 STEP
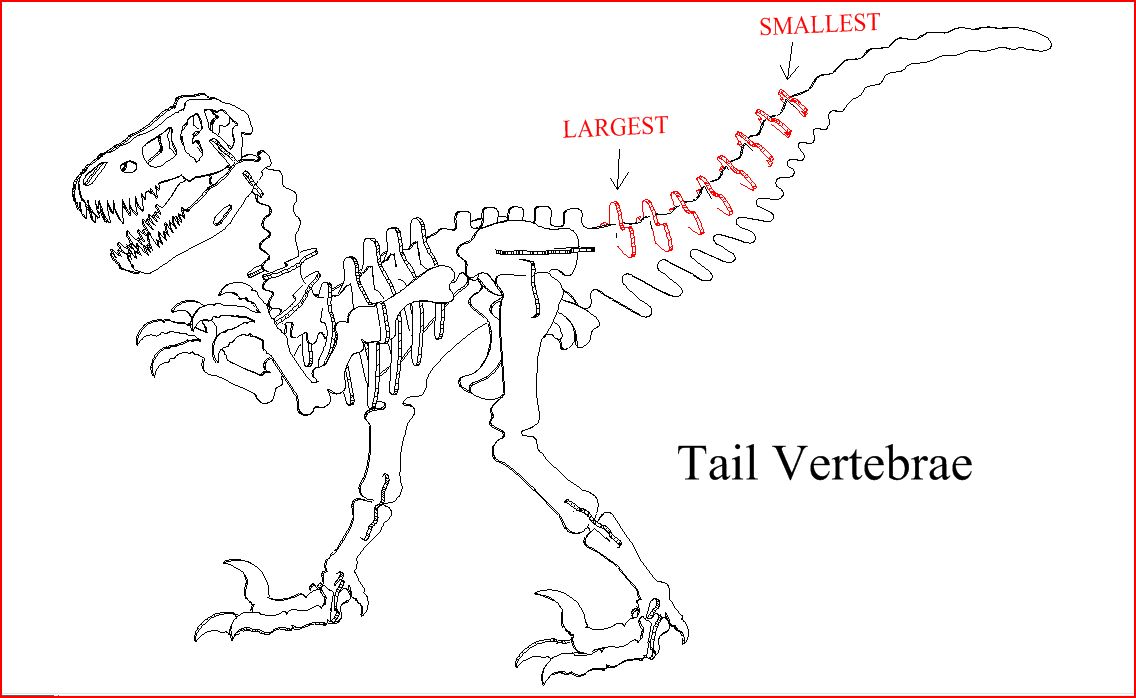
ELEVEN: The caudal vertebrae. These are the bones along the top of the
tail. Arrange the caudal vertebrae in front of you from largest to smallest then
install them on the tail in the same order. Largest bones towards the body,
smallest bones towards the tip of the tail.
STEP
ELEVEN: The caudal vertebrae. These are the bones along the top of the
tail. Arrange the caudal vertebrae in front of you from largest to smallest then
install them on the tail in the same order. Largest bones towards the body,
smallest bones towards the tip of the tail.
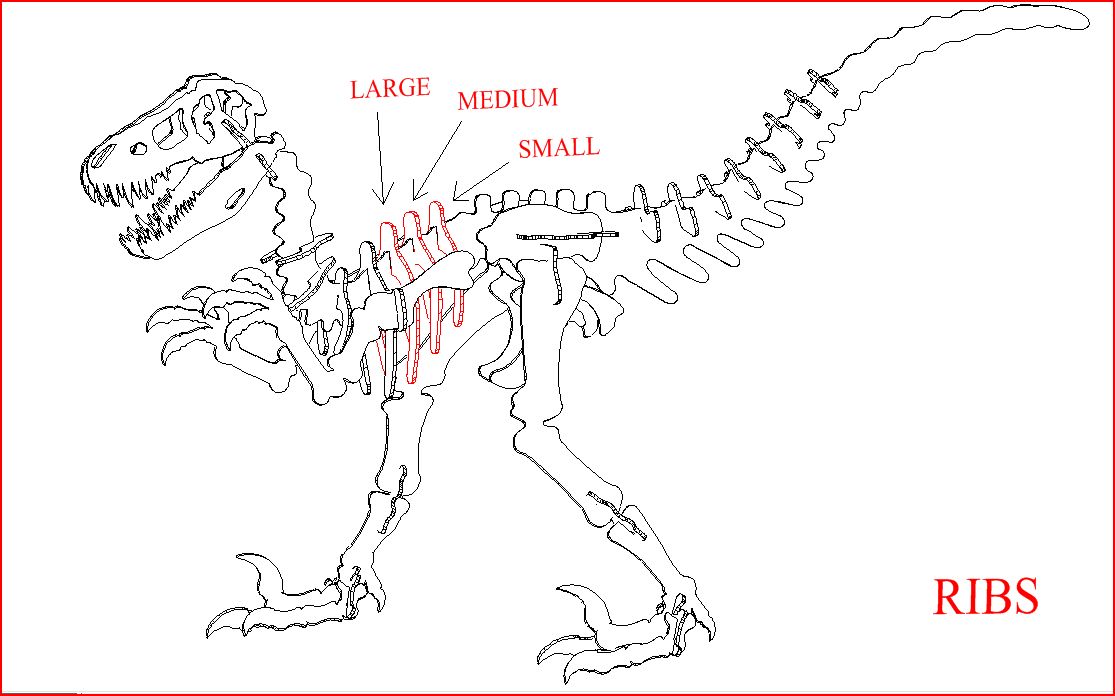 STEP
TWELVE: The ribs. Our ribs each represent one rib and one dorsal vertebra. Other
than the center rib and dorsal vertebra which is already installed, there are
three other large ribs. The smallest is inserted in the rearmost slot on the top
of the neck (towards the body). The largest is inserted closest to the
center rib.
STEP
TWELVE: The ribs. Our ribs each represent one rib and one dorsal vertebra. Other
than the center rib and dorsal vertebra which is already installed, there are
three other large ribs. The smallest is inserted in the rearmost slot on the top
of the neck (towards the body). The largest is inserted closest to the
center rib.
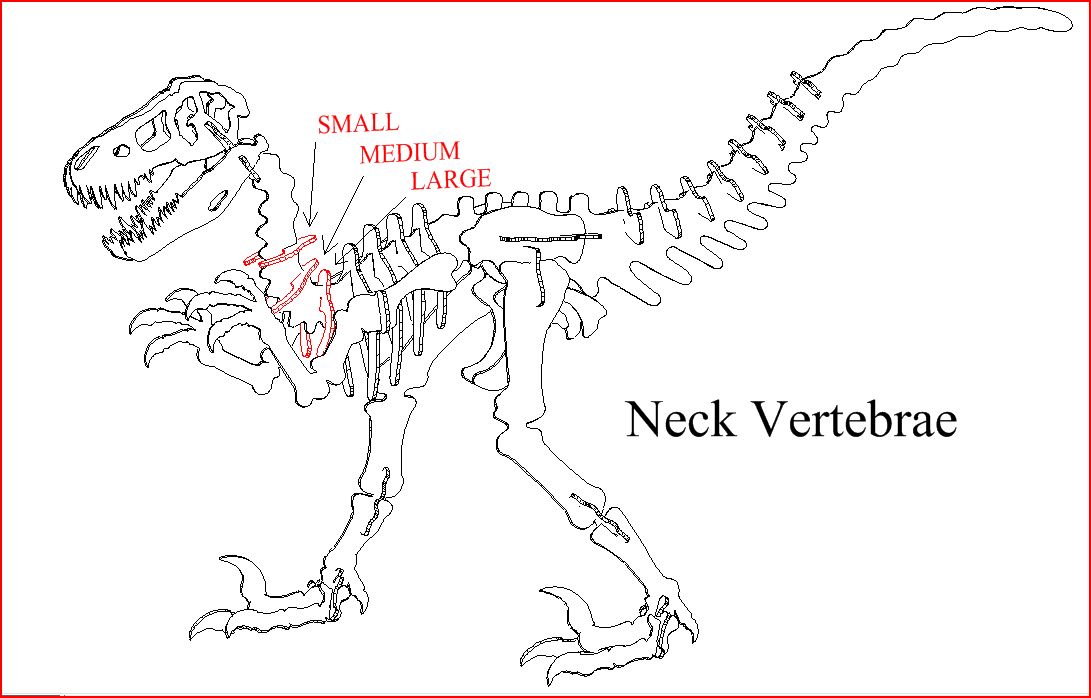 STEP
THIRTEEN: Neck vertebrae. There are 3 parts that look like small ribs. These
represent the cervical vertebrae along the top of the neck. Insert the cervical
vertebrae in the slots on the top of the neck with the smallest vertebra nearest
the neck. Largest nearest the center rib. Now, the arms can be inserted into the
center rib. The upper arm (scapula) has one slot. Insert this slot into the
outer slot on one side of the center rib. Repeat for the opposite side. The arms
are slightly different but will work on either side.
STEP
THIRTEEN: Neck vertebrae. There are 3 parts that look like small ribs. These
represent the cervical vertebrae along the top of the neck. Insert the cervical
vertebrae in the slots on the top of the neck with the smallest vertebra nearest
the neck. Largest nearest the center rib. Now, the arms can be inserted into the
center rib. The upper arm (scapula) has one slot. Insert this slot into the
outer slot on one side of the center rib. Repeat for the opposite side. The arms
are slightly different but will work on either side.
 STEP FOURTEEN: The pelvic bones and key. This is a
little tricky so take a moment to look at the parts to understand how they go
together. The pelvic bones need the 'key' to stay in place. Insert both
pelvic bones with the "pubis" or largest bone pointed forward. Hold
them BOTH in place and then inset the
key into the key slots from the rear.
STEP FOURTEEN: The pelvic bones and key. This is a
little tricky so take a moment to look at the parts to understand how they go
together. The pelvic bones need the 'key' to stay in place. Insert both
pelvic bones with the "pubis" or largest bone pointed forward. Hold
them BOTH in place and then inset the
key into the key slots from the rear.

Jaw Connector. Pinch the front of the lower jaw together and insert the jaw connector to hold the lower jaws properly in place.

Puzzle Key. View or print this 'key' to help assemble your 3d statue Click here.
Here's a short video to help with alignment, balance, and the newest modifications to the hands (steel item shown) :
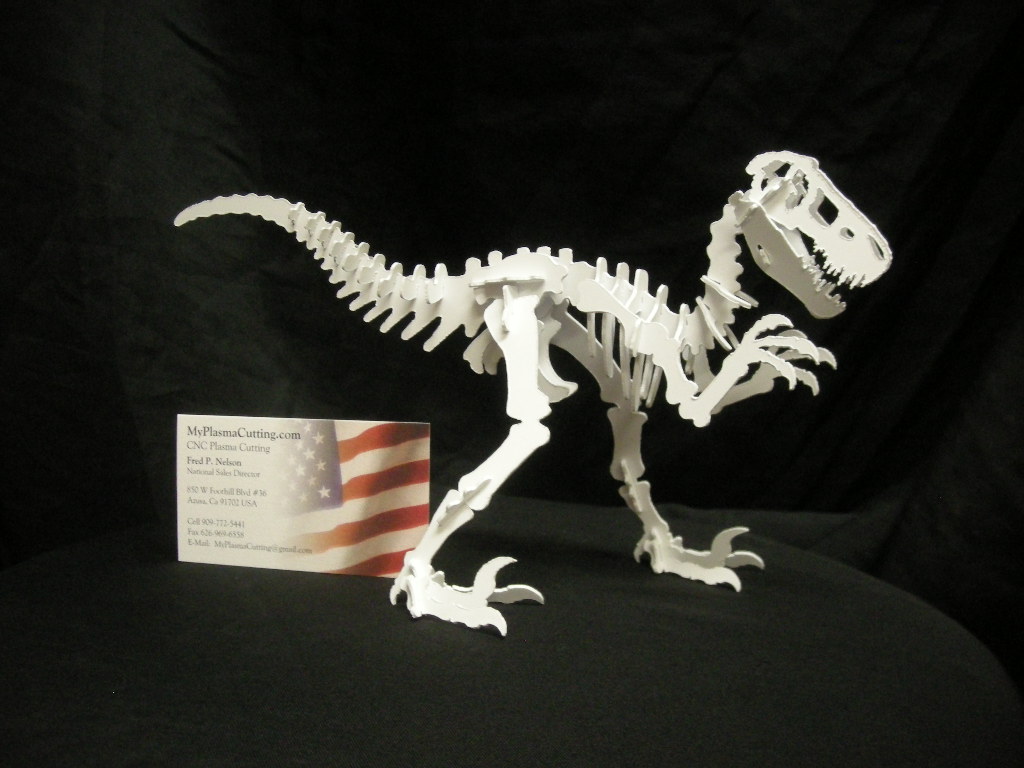
Cool facts: Our 3D dinosaur puzzle is based on a nearly complete real Allosaurus found in Wyoming in 1991. The discoverers named him "Big AL". This dinosaur was a giant therapod that lived abundantly in North America about 150 million years ago. The species survived in various forms for tens of millions of years all throughout the dinosaur age. Dinosaurs like Big AL grew to nearly 40 feet long, 16 feet tall, and weighed up to 4 tons. This type of dinosaur shed broken and dull teeth which re-grew and were replaced regularly like a modern shark. Not only was AL's 3 foot skull full of these dagger sized teeth, the mouth was likely dripping with deadly saliva like a modern Komodo dragon. AL could "un-hinge" his jaw like a modern snake to swallow food larger than it's own head. No animal was safe during the late Jurassic period with Big AL around. The Allosaurus was certainly the top predator of it's era and perhaps the most successful predator there will ever be.....and that's a good thing.
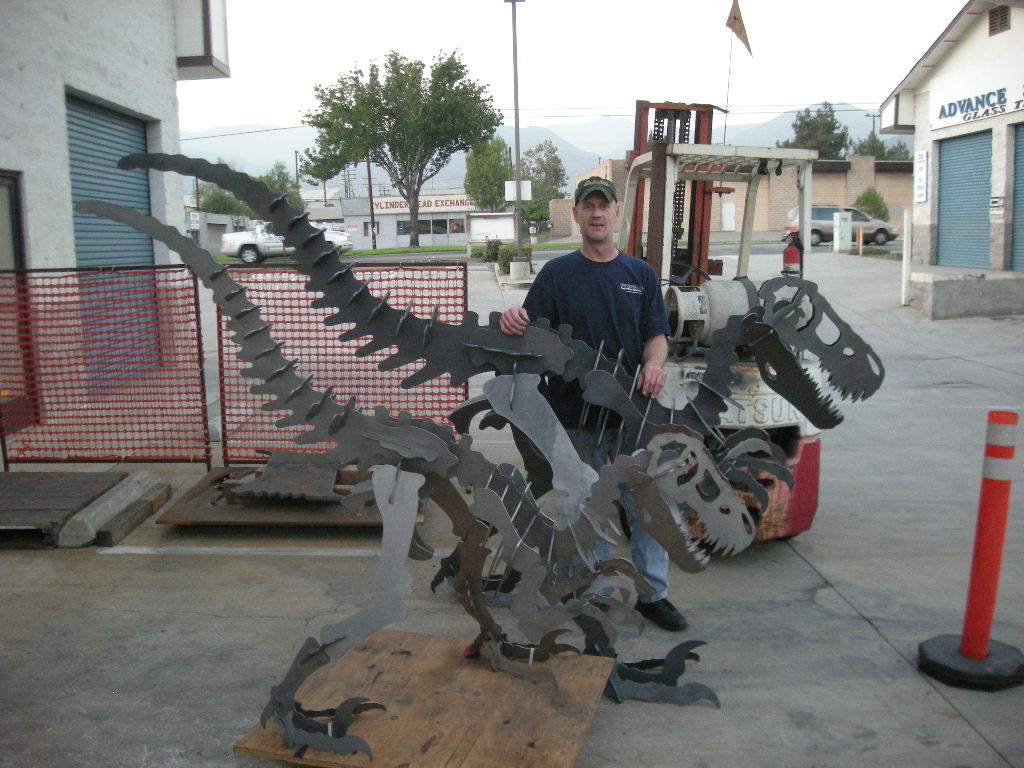
This page is intended for customers and vendors of MyPlasmaCutting.com. If you have NOT already purchased one of our 3D dinosaur puzzles or sculptures visit our online store for ordering instructions. This item is available in several sizes.
We also offer the raw dxf files for use with CNC plasma cutters, lasers, routers, or water jet cutting machines. For puzzles and sculptures see our online store OR for the raw dxf file (for CNC cutting) see our dxf CNC cutting files.
Material / gage Length
11 gage steel 37 inches
11 gage aluminum 37 inches
3/16ths steel 7 feet
3/16ths aluminum 7 feet
1/4 inch steel 10 feet 2 inches
5/16ths steel TBD
1/2 inch steel 17 feet
1 inch steel plate TBD
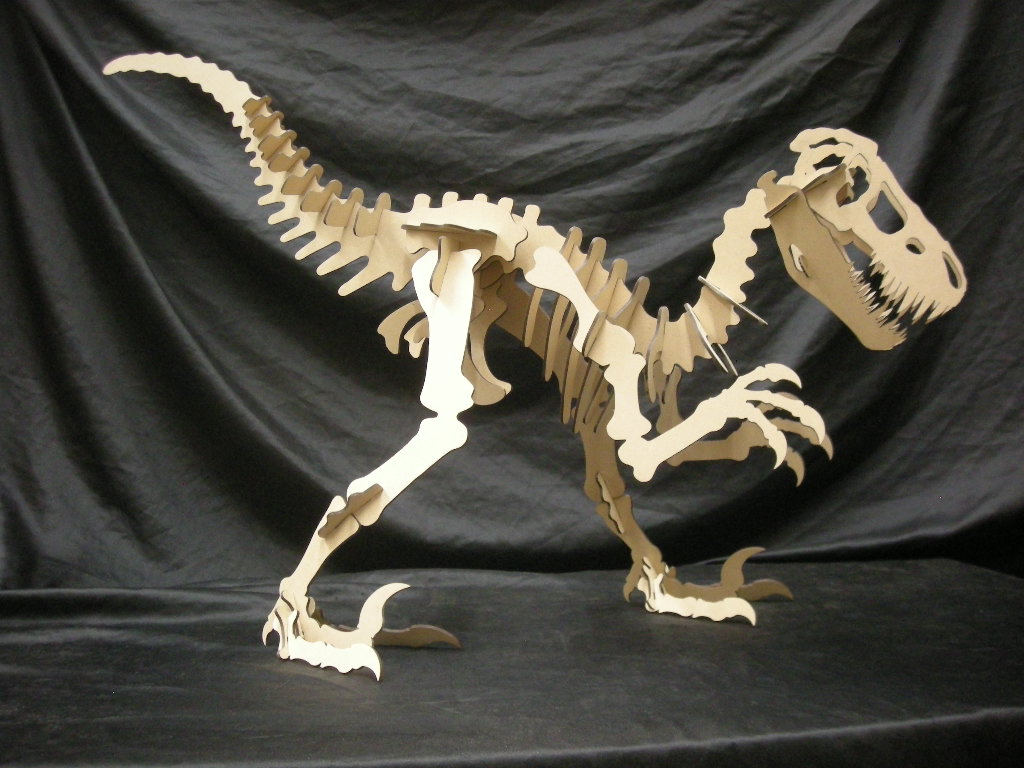
Raptor 1/16 PLASTIC
Raptor 1/8 MDF
Raptor 11 GAGE ALUMINUM
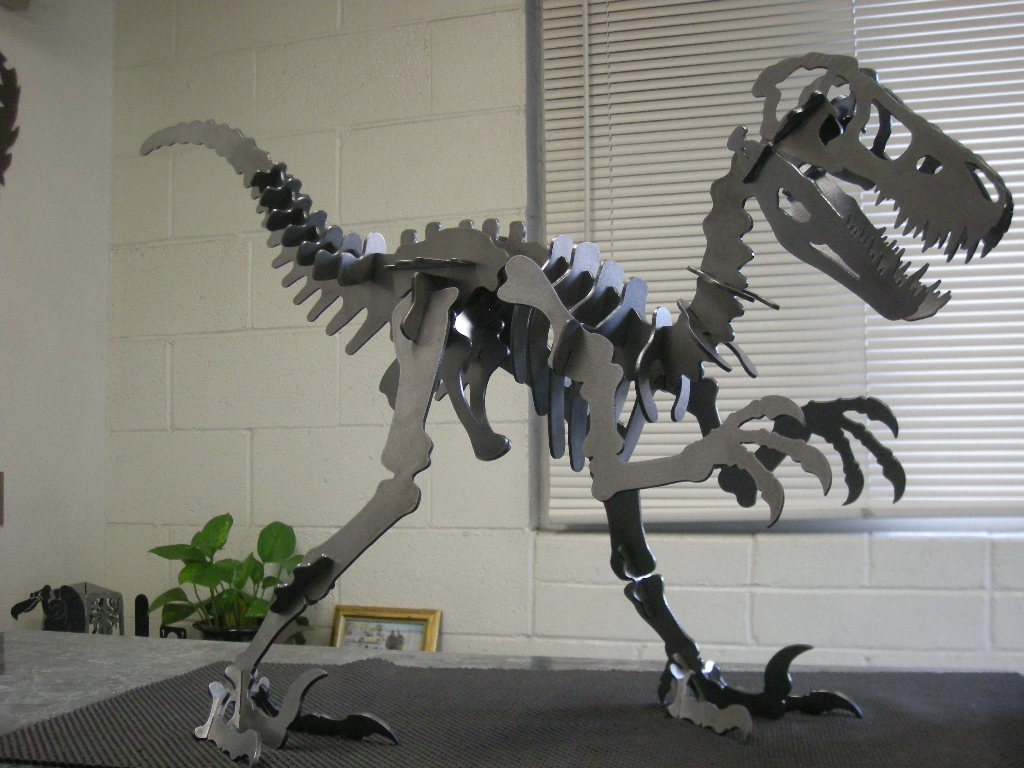
Raptor 11 GAGE STEEL
Raptor 3/16ths ALUMINUM
Raptor 3/16ths STEEL
Raptor 1/4 in. STEEL
IF YOU CUT YOUR OWN: When you create your cut path, put the start point for each part at one of the slots (cut a slot to begin each part). Otherwise, at smaller scales, the part may drop out or tilt before the cutter is able to finish the final slot. Scale your drawing for the appropriate material thickness (slot size matches material thickness). Cut 2 test parts to check the slot clearance at your desired scale and re-scale and test as needed to insure that the parts fit together properly before you cut the entire pattern.
If you have Chrome or Firefox you can view an interactive 3D drawing below (You can explore the drawing with your mouse... Drag to rotate, SHIFT+drag to pan, and ALT+drag to zoom):
Produced by Fred Nelson Fabrication for MyPlasmaCutting.com 1999-present. All rights reserved.